
How to build a custom object detector using YOLOv3 in Python
Introduction
After publishing the previous post How to build a custom object detector using Yolo, I received some feedback about implementing the detector in Python as it was implemented in Java. So, in this post, we will learn how to train YOLOv3 on a custom dataset using the Darknet framework and also how to use the generated weights with OpenCV DNN module to make an object detector. For this case, I collected a dataset for my Rubik’s Cube to create a custom object detector to detect it.
Requirements:
- Darknet, it is an open source neural network framework supports CPU and GPU computation
- Anaconda or pip with python 3.5. In this tutorial, we will use anaconda, you can get it from here.
- [Optional] In case you prefer using docker, you can build a docker image contains darknet and OpenCV 3.3 both are compiled with CUDA from this docker file https://github.com/tahaemara/yolo-custom-object-detector/tree/master/docker.
- LabelImg, it is an application to annotate the objects in images.
- Source Code, you can get it from https://github.com/tahaemara/yolo-custom-object-detector.
- Webcam, I used ELP Sony IMX322 Sensor Mini USB Camera
.
Dataset Collection and Annotating
I collected a dataset for my Rubik's Cube through my webcam with the size of (416x416) with different positions with different poses and scales to provided a reasonable accuracy. The next step is to annotate the dataset using LabelImg to define the location (Bounding box) of the object (Rubik's cube) in each image. Annotating process generates a text file for each image, contains the object class number and coordination for each object in it, as this format "(object-id) (x-center) (y-center) (width) (height)" in each line for each object. Coordinations values (x, y, width, and height) are relative to the width and the height of the image. I hand-labeled them manually with, it is really a tedious task.
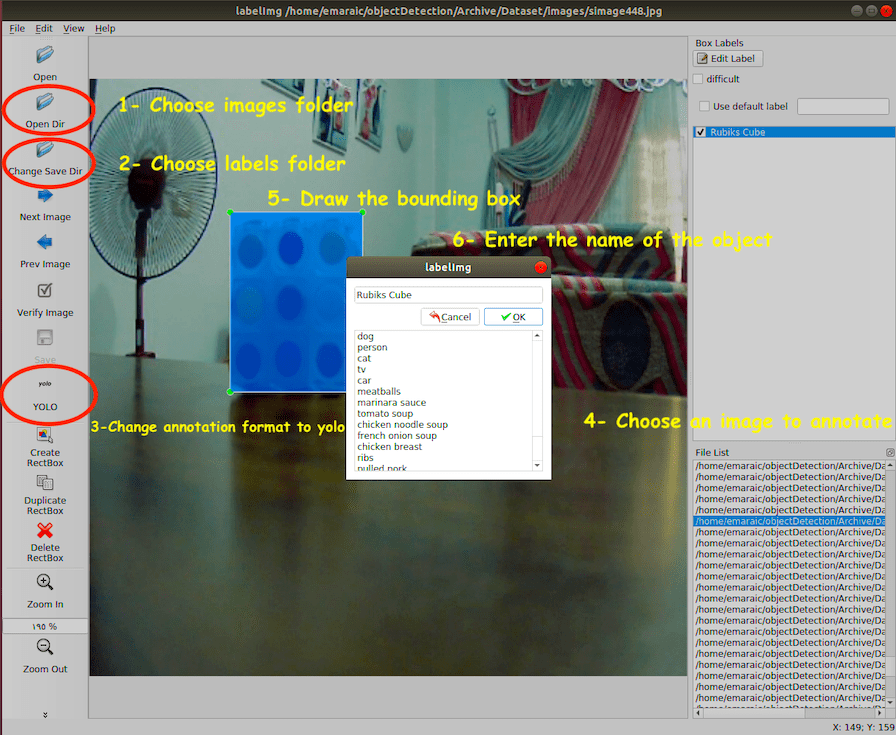
The steps to annotate Rubik's cubes in images using LabelImg:
- Create a folder contains images files and name it "images".
- Create a folder contains annotations files and name it "labels". Folders "images" and "labels" must be in the same directory.
- Open LabelImg application.
- Click on "Open Dir" and then choose the Images folder.
- Click on "Change Save Dir" and choose the labels folder.
- Right below "Save" button in the toolbar, click "PascalVOC" button to switch to YOLO format.
- You will find that all images are listed in the File List panel.
- Click on the Image you want to annotate.
- Click the letter "W" from your keyboard to draw the rectangle on the desired image object, type the name of the object on the popped up window.
- Click "CTRL+S" to save the annotation to the labels folder.
- Repeat steps 8 to 10 till you complete annotating all the images.
Installing Darknet
Darknet is an open source neural network framework supports CPU and GPU computation. You can follow the installation instructions darknet from the official website here. In case you prefer using docker, I wrote a docker file by which you can build a docker image contains Darknet and OpenCV 3.3 both are compiled with CUDA. This docker file can be downloaded from https://github.com/tahaemara/yolo-custom-object-detector/tree/master/docker .
Notes
If you try to install darknet with CUDA in Ubuntu 18.04 and face this problem "unsupported GNU version! gcc versions later than 6 are not supported!", just execute the following commands:
- sudo apt-get install gcc-6 g++-6
- sudo update-alternatives --install /usr/bin/g++ g++ /usr/bin/g++-6 10
- sudo update-alternatives --install /usr/bin/gcc gcc /usr/bin/gcc-6 10
Before the training process
Preparing training configuration files
-
Generate train.txt and test.txt files
After collecting and annotating dataset, we have two folders in the same directory the "images" folder and the "labels" folder. Now, we need to split dataset to train and test sets by providing two text files, one contains the paths to the images for the training set (train.txt) and the other for the test set (test.txt). This can be done using the following script [1] after editing the dataset_path variable to the location of your dataset folder. After running this script, the train.txt and test.txt files will be generated in the directory of this script.
import glob, os dataset_path = '/path/to/Dataset/images' # Percentage of images to be used for the test set percentage_test = 10; # Create and/or truncate train.txt and test.txt file_train = open('train.txt', 'w') file_test = open('test.txt', 'w') # Populate train.txt and test.txt counter = 1 index_test = round(100 / percentage_test) for pathAndFilename in glob.iglob(os.path.join(dataset_path, "*.jpg")): title, ext = os.path.splitext(os.path.basename(pathAndFilename)) if counter == index_test+1: counter = 1 file_test.write(dataset_path + "/" + title + '.jpg' + "\n") else: file_train.write(dataset_path + "/" + title + '.jpg' + "\n") counter = counter + 1 -
Modify Cfg for our dataset
We will need to modify the YOLOv3 tiny model (yolov3-tiny.cfg) to train our custom detector. This modification includes:
- Uncomment the lines 5,6, and 7 and change the training batch to 64 and subdivisions to 2.
- Change the number of filters for convolutional layer "[convolution]" just before every yolo output "[yolo]" such that the number of filters= #anchors x (5 + #ofclasses)= 3x(5+1)= 18. The number 5 is the count of parameters center_x, center_y, width, height, and objectness Score. So, change the lines 127 and 171 to "filters=18".
- For every yolo layer [yolo] change the number of classes to 1 as in lines 135 and 177.
Other files are needed to be created as "objects.names" which its name implies that it contains names of classes, and also the file "training.data" which contains parameters needed for training as described in the next table.
File Name Description Sample objects.names It contains the names of the classes. Also, the line number represents the object id in the annotations files. Rubiks Cube
trainer.data It contains : - Number of classes.
- Locations of train.txt and test.txt files relative to the darknet main directory.
- Location of objects.names file relative to the darknet main directory.
- Location of the backup folder for saving the weights of training process, it is also relative to the darknet main directory.
classes= 1
train  = custom/train.txt
valid  = custom/test.txt
names = custom/objects.names
backup = backup/
yolov3-tiny.cfg It contains the training parameters as batch size, learning rate, etc., and also the architecture of the network as number of layer, filters, type of activation function, etc.
Download Pretrained Convolutional Weights
The main idea behind making custom object detection or even custom classification model is Transfer Learning which means reusing an efficient pre-trained model such as VGG, Inception, or Resnet as a starting point in another task. For training YOLOv3 we use convolutional weights that are pre-trained on Imagenet. We use weights from the darknet53 model. You can just download the weights for the convolutional layers here (76 MB) and put it in the main directory of the darknet.
Start training
Before starting the training process we create a folder "custom" in the main directory of the darknet. Then we copy the files train.txt, test.txt, objects.names, yolov3-tiny.cfg, and trainer.data inside the "custom" folder . After that, we start training via executing this command from the terminal
./darknet detector train custom/trainer.data custom/yolov3-tiny.cfg darknet53.conv.74
Notes
- Weights will be saved in the backup folder every 100 iterations till 900 and then every 10000.
- Kill the training process once the average loss is less than 0.06, or once the avg value no longer increases.
Region 23 Avg IOU: 0.880141, Class: 0.999959, Obj: 0.999842, No Obj: 0.000690, .5R: 1.000000, .75R: 1.000000,  count: 1498591: 0.033501, 0.063296 avg, 0.000010 rate, 0.004106 seconds, 498591 images
Loaded: 0.003061 seconds
Making the Real-time detector
Installing OpenCV using Anaconda
- Create conda environment with this command
conda create --name opencv python=3.5
- Activate opencv environment with this command
source activate opencv
- Install OpenCV with this command
conda install -c conda-forge opencv
or this oneconda install -c conda-forge/label/broken opencv
Real-time detector code
After installing OpenCV, just run the following code [2] on opencv environment by executing this command “python yolo_opencv.py -c /path/to/yolov3-tiny.cfg -w /path/to/yolov3-tiny_finally.weights -cl /path/to/objects.names”.
import cv2
import argparse
import numpy as np

ap = argparse.ArgumentParser()
ap.add_argument('-c', '--config',
                help = 'path to yolo config file', default='/path/to/yolov3-tiny.cfg')
ap.add_argument('-w', '--weights',
                help = 'path to yolo pre-trained weights', default='/path/to/yolov3-tiny_finally.weights')
ap.add_argument('-cl', '--classes',
                help = 'path to text file containing class names',default='/path/to/objects.names')
args = ap.parse_args()


# Get names of output layers, output for YOLOv3 is ['yolo_16', 'yolo_23']
def getOutputsNames(net):
    layersNames = net.getLayerNames()
    return [layersNames[i[0] - 1] for i in net.getUnconnectedOutLayers()]


# Darw a rectangle surrounding the object and its class name
def draw_pred(img, class_id, confidence, x, y, x_plus_w, y_plus_h):

    label = str(classes[class_id])

    color = COLORS[class_id]

    cv2.rectangle(img, (x,y), (x_plus_w,y_plus_h), color, 2)

    cv2.putText(img, label, (x-10,y-10), cv2.FONT_HERSHEY_SIMPLEX, 0.5, color, 2)

# Define a window to show the cam stream on it
window_title= "Rubiks Detector"
cv2.namedWindow(window_title, cv2.WINDOW_NORMAL)


# Load names classes
classes = None
with open(args.classes, 'r') as f:
    classes = [line.strip() for line in f.readlines()]
print(classes)

#Generate color for each class randomly
COLORS = np.random.uniform(0, 255, size=(len(classes), 3))

# Define network from configuration file and load the weights from the given weights file
net = cv2.dnn.readNet(args.weights,args.config)

# Define video capture for default cam
cap = cv2.VideoCapture(0)

while cv2.waitKey(1) < 0:

    hasframe, image = cap.read()
    #image=cv2.resize(image, (620, 480))

    blob = cv2.dnn.blobFromImage(image, 1.0/255.0, (416,416), [0,0,0], True, crop=False)
    Width = image.shape[1]
    Height = image.shape[0]
    net.setInput(blob)

    outs = net.forward(getOutputsNames(net))

    class_ids = []
    confidences = []
    boxes = []
    conf_threshold = 0.5
    nms_threshold = 0.4


    #print(len(outs))

    # In case of tiny YOLOv3 we have 2 output(outs) from 2 different scales [3 bounding box per each scale]
    # For normal normal YOLOv3 we have 3 output(outs) from 3 different scales [3 bounding box per each scale]

    # For tiny YOLOv3, the first output will be 507x6 = 13x13x18
    # 18=3*(4+1+1) 4 boundingbox offsets, 1 objectness prediction, and 1 class score.
    # and the second output will be = 2028x6=26x26x18 (18=3*6)

    for out in outs:
        #print(out.shape)
        for detection in out:

        #each detection  has the form like this [center_x center_y width height obj_score class_1_score class_2_score ..]
            scores = detection[5:]#classes scores starts from index 5
            class_id = np.argmax(scores)
            confidence = scores[class_id]
            if confidence > 0.5:
                center_x = int(detection[0] * Width)
                center_y = int(detection[1] * Height)
                w = int(detection[2] * Width)
                h = int(detection[3] * Height)
                x = center_x - w / 2
                y = center_y - h / 2
                class_ids.append(class_id)
                confidences.append(float(confidence))
                boxes.append([x, y, w, h])

    # apply  non-maximum suppression algorithm on the bounding boxes
    indices = cv2.dnn.NMSBoxes(boxes, confidences, conf_threshold, nms_threshold)

    for i in indices:
        i = i[0]
        box = boxes[i]
        x = box[0]
        y = box[1]
        w = box[2]
        h = box[3]
        draw_pred(image, class_ids[i], confidences[i], round(x), round(y), round(x+w), round(y+h))

    # Put efficiency information.
    t, _ = net.getPerfProfile()
    label = 'Inference time: %.2f ms' % (t * 1000.0 / cv2.getTickFrequency())
    cv2.putText(image, label, (0, 15), cv2.FONT_HERSHEY_SIMPLEX, 0.5, (255, 0, 0))

    cv2.imshow(window_title, image)
Further Reading
- What’s new in YOLO v3?.
- YOLOv3: An Incremental Improvement
- How to implement a YOLO (v3) object detector from scratch in PyTorch: Part 1.